Exclusions Apply
*Insert Terms Here.
Insert Exclusions Here
FLOR Installation Instructions
How to Install FLOR Carpet Tiles
- Step-by-step instructions and helpful tips for installing FLOR carpet tiles are available in each FLOR box. You can also download the instructions via the button below.
- If you don't find what you're looking for and need more assistance, please click the chat bubble in the lower right corner of your screen to get assistance from a Customer Care representative now, or contact Customer Care to have a representative reach out to you in 2-3 business days.
Download Instruction Manual
FLOR INSTALLATION METHODS
*Refer to the sticker on the back of the carpet tile or the product specification for the recommended installation method.
What is FLOR?
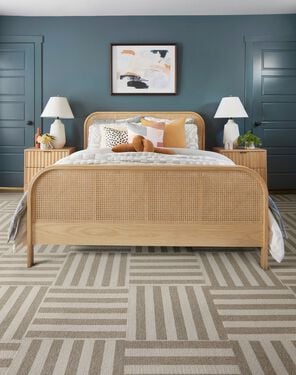
FLOR 19.7” (50 cm) carpet squares come in an array of styles consisting of a complementing range of colors and textures. Beautiful on their own or when coordinated together, FLOR carpet tiles allow you the flexibility to create an area rug design individual to your taste, your need and your space.
Putting a FLOR design all together in your home is quick, easy, and creatively fun. From area rugs, to runners, to wall-to-wall floor coverings, FLOR has you covered with area rug assembly guidance, instruction, and options.
Using FLORdots™
Our ingenious, patented FLORdots are what hold the innovative design system of FLOR together. Available in original FLORdots and FLORdots+, these one-sided, non-toxic adhesives stick to the bottom of each carpet tile - sticky side up. The tile then adheres to its carpet tile neighbor - not to the floor underneath - for sturdy, secure positioning that holds area rugs, runners, and wall-to-wall designs in place.
With FLORdots there’s no need for smelly glues, sharp nails, or even floor pads. Plus, FLOR’s expertly engineered backing is designed to “hug” the floor underneath, making standard rug and carpet padding obsolete.
Once a rug has been “dotted” it cannot be returned so be sure you are satisfied with your design before final application of the FLORdots to the bottom of the carpet tiles.
FLORdots+ rug adhesives work exclusively with the Industrious Style and Carbon Negative Collection, including Hemisphere, Stratosphere, and Peninsula. Original FLORdot tile stickers work with all other FLOR carpet tile styles. Each order of either FLORdots or FLORdots+ contains one set of twelve dots.
Where Should FLOR Go?
FLOR plays best with hardwood, vinyl tile, sheet vinyl, or laminated flooring that is smooth, dry, level, and clean. If needed, sweep or vacuum first, then wipe up excess dust.
FLOR can be installed virtually in any indoor area that has a clean, hard, dry surface. It can also be installed over smooth, fully-cured (minimum 90 days) concrete floors. Concrete needs to be sealed with a non-solvent based moisture vapor control sealer before installing FLOR. These are typically polymer based (urethane, epoxy, acrylic) and designed specifically to control moisture emission rates of the concrete slab (internal moisture not topical spills). FLOR is not designed to go over carpeted floors or carpet padding.
Can FLOR Rugs Get Wet?
FLOR carpet tiles are fairly resistant to the effects of moisture, and under normal use will not allow moisture through the face to the surface below. Instead, moisture will simply remain on the face of the tile until it is blotted with a clean, white cloth or until it evaporates. However, if the spill occurs at the seam, it can wick under the tile, in which case, the tile(s) affected should be removed to clean.
For liquid spills that aren’t just water, FLOR rugs can be washed to prevent stains and odors from developing. To clean your washable FLOR rug, just remove the soiled carpet tiles, apply a non-citrus/non-solvent cleaner, scrub gently, and rinse under cool water. Always ensure your carpet tiles are thoroughly dry before placing them back in your FLOR rug.
FLOR products are not, however, completely impervious to nature’s effects. Prolonged exposure to excessive moisture may cause some discoloration to the adjacent floor surface, as well as some mildew/ mold growth (typically underneath the surface). Direct exposure to sunlight over a prolonged period may also cause some color fading. Please see FLOR’s installation information and Warranty for further information.
Easy DIY assembly
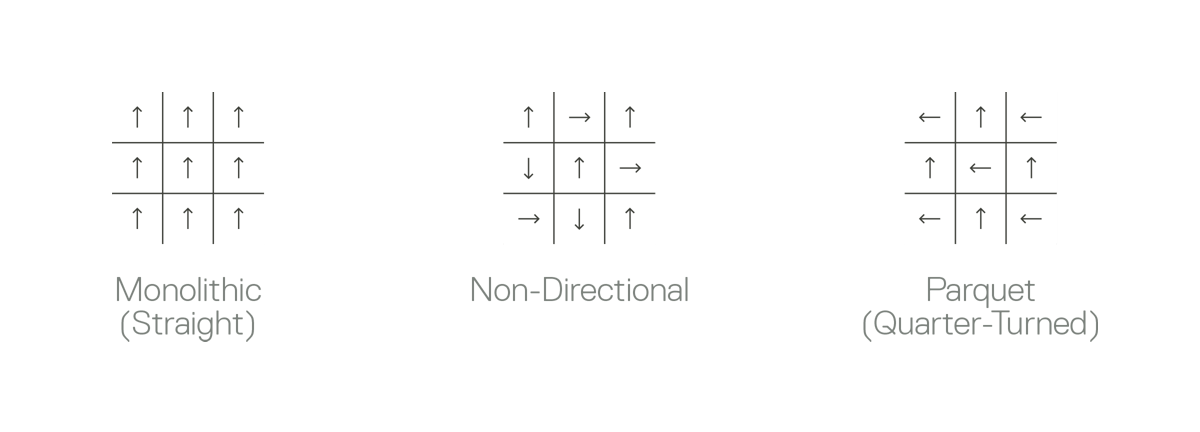
Carpet Tile Direction
FLOR carpet tiles are assembled in one of three ways:
(1) Monolithically or laying all of the tiles in the same direction. There is a directional arrow on the back of each tile to guide the correct placement.
(2) In a parquet pattern with the tiles (and directional arrows) rotated 90 degrees from each other to form a geometric pattern.
(3) Non-directional, laying tiles in a random pattern.
FLOR will recommend a carpet tile installation direction specific to your own rug design, but the final creative decision is always yours.
Trimming Carpet Tiles
How to Cut FLOR Carpet Tiles
Often it’s necessary to trim or cut FLOR carpet tiles for your design, specifically with a wall-to-wall floor covering where tiles align with the wall. Area rugs and runners may require trimming for design customizations.
- To cut FLOR tiles, you’ll need a metal, straight edge or a sharp utility knife.
- Use the metal edge to guide the knife and score (create a cut groove) the back of the carpet tile a few times to get a clean cut.
- You can also utilize our Cutting Services and we’ll do all the work for you. Additional information and pricing on cuts can be found on each product page or by calling 866.952.4093 to learn more.
TILE REPLACEMENT
Tiles that become badly stained or damaged can be replaced. Tiles can be removed by carefully using a sharp blade, like a carpet knife, to cut through each FLORdot releasing the tile. Remove FLORdot from any tiles that remain. Do not try to pull or rip the tiles apart. Doing so could result in damage or tears to the tile itself. Replace the tile and use a new FLORdot. Be sure that the face fibers of surrounding tiles are brushed upright and that the replacement tile is installed carefully to prevent pile fibers from becoming trapped between joints. Replacement carpet tiles will likely have a newer appearance than the ones being replaced. If new tiles stand out in sharp contrast to surrounding existing tiles, you may want to shuffle them around. Place the new tile(s) in less visible areas and place existing tiles in a more visible area.
Why FLOR?
We created FLOR to help you design a rug without compromising your style, your lifestyle, or the planet.
Learn More
ARRAS COLLECTION
The Arras Collection leverages innovative technology to create dynamic pile heights and patterning reminiscent of flat weave rugs.
Shop Now